Digital Image Manipulation
Adobe Photoshop Elements 2.0
In this exercise, I want to show you some of the possibilities of Photoshop Elements that might be fun for you to try.
Open up Photoshop Elements on your computer and keep these instructions on your screen as well.
Follow along in Photoshop, then come back to parts of this lesson from time to time to understand what is going on.
Here are our two images:

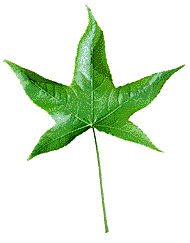
Save each of these images to your student folder.
Then open the images into Photoshop -- and under the image menu, pick mode and change it to RGB, rather than indexed, color, if it hasn't been converted already.
We're going to do some fun things with these images to show you how Layers and other Photoshop basics work:
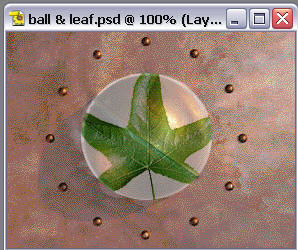
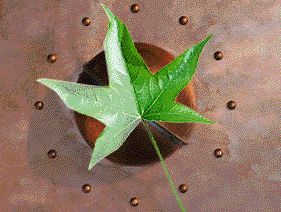
1. Here's the finished product, just so that you know what we're trying to achieve: It is a portion of the leaf that is faded and combines with a circle appearing over the leaf.
The first step is to have both of the files -- leaf and ball -- open
in Photoshop.
Copy the ball picture above and go to Photoshop, go to the File menu and
choose New from Clipboard

This will paste the ball into Photoshop.
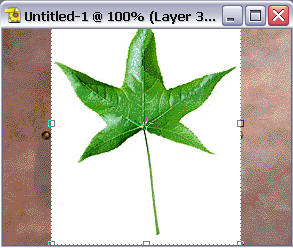
Repeat the same for the leaf picture.
Then, click on ball.gif. This is
what you are working on. Go to the window menu, select Layers. (If layers
has a check mark, you already have that palette up.)
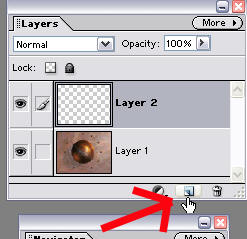
The second step is to create a new layer. You can do that many ways, but let's click on the small icon that looks like a folded corner at the bottom of your layers palette. It looks like this:
Next, click on the marquee tool. In your tool box, the marquee tool is the one in the upper left corner, shaped either like a square or a circle with a dotted line. Make sure you've selected the circular one for this exercise. (To select the circle, click and hold on the marquee and a menu will appear, drag it over to the circle.)

In your layers palette, you should have the Layer 1 selected. If not, click on it.
With your marquee tool, draw a circle about the same size as the ball. If you don't like the results, try again by clicking control z to undo your mistake and, then, do it again.
Once you have a circle, you want to fill it with white -- or any color that suits your fancy. White is the default background color.
Under the edit menu, select fill and this dialog will come up:
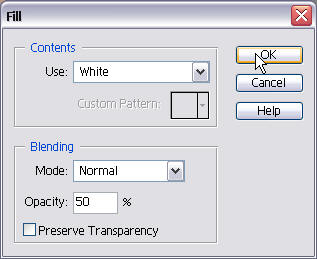
Make sure your opacity is set to 50 percent or so, according to taste. Click OK in the box, and this will be your result:

Next you need to take away the selected section (the dotted circle
shape). To do this go to the Select
menu and choose
Deselect.
Next , click on the leaf.gif image. Look at the Layers Palette. Click and hold on Layer 1. (The palette might not look exactly like this, but similar, just hold the little thumbnail picture):
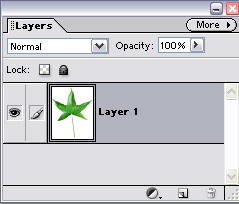
While holding your mouse button from Layer 1, drag layer one over the top of your ball picture and let go of the mouse. This will result in something like this:
Now look at the Layers Palette again. Your layers palette will now have three layers. Making sure you are on Layer 3, click the small arrow beside the word Normal and from the list that appears choose Multiply


This will result in something like this:

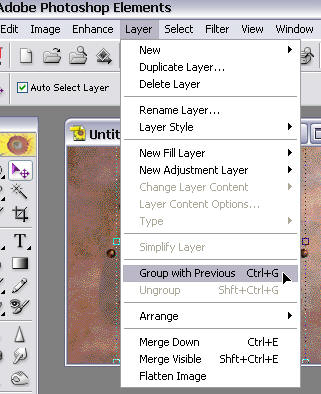
Next, you will Group with Previous. Under the Layer menu, you select Group with Previous. Control G also will do the same thing. This will cut off the edges of the leaf and make what's left 50 percent opaque:

Now is the time to save this in your folder.
You may want to Free Transform -- under the Edit menu -- to move or rotate the image slightly for fun effects. Try that on your own.
PHOTOSHOP Task 1
The task for you to complete is to do this exercise again with two other pictures. You could use any of the pictures on the pages with links below or you might look on the Internet for copyright free photographs you can copy.
Here are links to find free photographs you can use:

Here's the next thing to try:
Make an opaque leaf over your ball:

Rather than creating a new layer that has a filled in circle, make your first step in this design dragging Layer 1 from leaf.gif over to ball.gif. The Green leaf will appear but with a white background, like the one below.

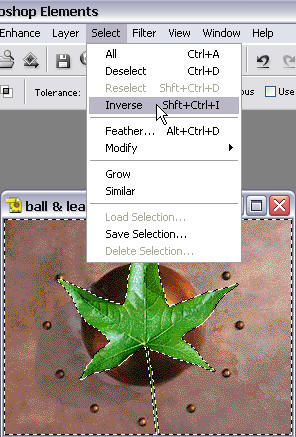
The next step is to clear away the white background of the leaf. Choose the Magic Wand Tool from the toolbox and click anywhere on the white background.

Now click the delete key on your keyboard

Go to the Select menu and choose Deselect. Choose the Magic Wand Tool from the toolbox, check that you are on the leaf layer and click anywhere except the leaf. Now open the Select menu and choose Inverse.
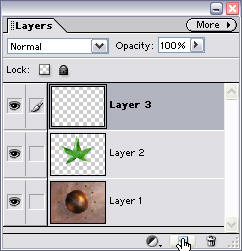
Next, create a new Layer. You'll see no change on your image, but your layers palette should look something like this:
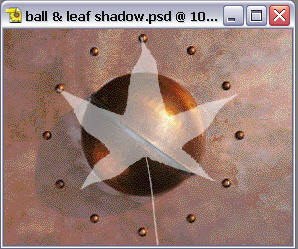
With Layer 3 selected, as shown -- and the leaf-shaped selection still showing on the image -- go to the edit menu and choose Fill. Do just as before. Fill at 50 percent opacity with white.
Go to the Select menu and choose Deselect.
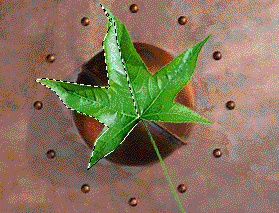
Our last step is to delete the leaf -- Layer 2. To do it, simply click and drag on the Layer 2 in your layers palette until your icon is over the small trash can at the bottom of the palette. You might also simply go to delete layer under the layers palette menu that appears when you click on the arrow at the upper right of the palette.
PHOTOSHOP Task 2
The task for you to complete is to do this exercise again with two other pictures. You could use any of the pictures on the pages with links from before or you might look on the Internet for copyright free photographs you can copy.
Here's another thing for you:
The next idea is a half mask over the leaf, so it is part opaque and partly clear.
Just as on the last one we did, your first step is dragging Layer 1 from the leaf over to ball.gif and then clear away the white background as before.
Once the leaf is over the ball and the background is clear, pick the Polygon Lasso Tool as shown:

Next, use the Polygon Lasso tool to create the shape below. Basically, click every time you change direction with your line. When you get back to the top, a click will connect your work.
Lastly, fill as before with 50 percent white opacity. This will result:
PHOTOSHOP Task 3
The task for you to complete is to do this exercise again with two other pictures. You could use any of the pictures on the pages with links from before or you might look on the Internet for copyright free photographs you can copy.
OK, here's the last idea for you:
The last idea is simply making shapes and filling them with different colors for effect:
Step one is to open the eyedropper tool -- as shown below:

With the eyedropper tool, you select your foreground color. Make it a blue or gold from the picture itself. You just click the eyedropper tool somewhere on the photo and it samples the colour.
Next, you will use your rectangular marquee tool to make a rectangular shape over your image.
Next, fill at 33 percent opacity. Instead of using white, use the foreground color.
The last step is to pick a second color, then make a second rectangle and then fill again.
Your result should look something like this:

This may be a little hard to see, but this effect can create lots of nice stuff for you.
PHOTOSHOP Task 4
The task for you to complete is to do this exercise again with two other pictures. You could use any of the pictures on the pages with links from before or you might look on the Internet for copyright free photographs you can copy.